Facebook Page

Sunday, 27 November 2011

Two Tone Devore

Two tone devore is a technique where you cross dye devore velvet with a combination of rective and acid dyes. For my samples, I chose to work with kenanthrol and procion mx dyes but if your trying this... Then dont be afraid to experiment! Dyes should always be mixed in a fume cabinate wearing a mask and latex gloves. Devore paste is an irritant so it can burn. Protective measures are neccessary.


Two Tone Devore Recipe:


Kenanthrol:
1 ½ tsp / 7g dye powder 
2 tbsp/ 20ml warm water
2 tbsp ammonium sulphate 
Stir until fully dissolved

Procion Mx

1 tsp/ 5g dye powder
2 tbsp/ 20ml warm water
2 tbsp/ 20g sodium chloride (household salt)
Stir until fully dissolved

I added these mixtures to a 4000ml dye water, which is just water in a bucket. I mixed it together using a large spoon.... Wet my velvet. Then dunked it slowly into the dye bath. I stirred it to make sure the dye had disperse to avoid air bubbles which create uneven coverage.  I left it for roughly 30 minutes and rinsed under cold water, then hot water. I alternated until the water ran clear. i dried my fabric in a spin dryer for a few minutes.

I then repeated the same process as mentioned in my previous post about printing with devore paste. Once I had printed and left to dry, I scrubbed away the devore section and was left with a stencil like effect. I used a Kenanthrol Gold Antique dye and a Procion Mx Charcoal.


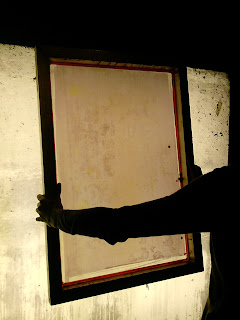
My Sample.

I taped my sample to the window, so that you guys can see the effect better. The outline of the feather is the area in which I printed with using the devore paste.

You can see in the photo above that the charcoal dye has taken to the main pile of the velvet and the antique gold has taken to the other threads of the fabric.

Saturday, 19 November 2011

Printing with Devore

EditedI learned how to print using a range of dyes. I printed with Devore paste on devore velvet and cotton and you can also get devore satin. Devore velvet is everywhere at the moment! The pair of shorts (Shown left) are from Topshop, this season. To check out their newest pieces click Topshop...

I tried this technique and found it very satisfying!


Devore Recipe:
 900ml of cold water in to an electric blender
 Then add 180g of Aluminium Sulphate
 and blend until it is all dissolved.
Now add 60g of Indalca PA3R powder to water
Blend this to a thick consistency 1 minute BUT (be careful not to over mix as this will burn out the blender motor)
Leave the paste to fully thicken for 30 minutes

This is my sample. I printed using the technique mentioned above. Once it was dry, I then overprinted one of the feathers using a black pigment. The cotton can have a very subtle finish, which can be sensitive to the motif/design applied to the fabric.
I printed as normal using my screen making sure that the paste had fully penetrated to the fabric. When using with velvet, its probably easiest to print on the back of the velvet rather than the pile of the fabric. I left the fabric to dry and ironed it on the medium setting until the print turns a golden brown colour. I then washed it under cold water and rubbed away where the paste has been. It may take a while and maybe a bit of elbow grease but the effort is worth it!


This velvet devore dress is by All Saints. Check out more of their stuff on All Saints Spitalfields and maybe sign up to their newsletter? I love their pieces!!!

River Island also have a range of scarves in devore cotton... They are similar to the Alexander Mcqueen devore scarf.


River Island
Alexander Mcqueen

Producing a silk screen. Coating and Exposing.

My coated screen

To produce a screen to print with, you need to prepare your screen. This process is called coating and exposing.This coating acts like a barrier to the parts of your design which is exposed.

Firstly I coated my screen. I done this by using light sensitive emulsion in a dark room. I poured the emulsion into a coating tray. I stood my silk screen against a wood board. I then held the tray against my screen until all of the emulsion had hit the screen. I pulled the tray up the screen ensuring that emulsion was hitting the screen constantly.I done this twice on both sides of my screen ensuring that I started to tip the tray back about 3 inches from the top of my screen.I then scraped any thick off using the tray holding it in a straight position. There should be an even coverage on both sides and no thick patches anywhere as this could result in poor exposure of the screen.

I left this to dry in a drying cabinet for 10-15 minutes ensuring nothing touched it and no wet screens were placed above or below it in the drying cabinet. Once this was fully dried, my screen was ready to have my designed applied to it. I cello taped my kodatrace (Drawing side down) onto to flat side of my screen. NOT the side which is shown in the picture above. I then placed it in the exposure unit with the kodatrace face down on the glass. My first attempt I put it into the exposure uni the wrong way up and it didn't expose at all. Be attentive to this because I have to strip and coat my whole screen again!! Typical. Design is a learning curve so always learn by your mistakes.

Once it has been exposed, the screen needs to be washed to remove the exposed emulsion which creates a stencil on your screen. If you have not done this before... the process will become clear as your doing it   =)
I washed mine in a trough with a back light which makes it easier to see which parts hasn't been exposed. I washed it gently with a shower head using warm water... This softens the emulsion and the silk.

Screen being washed with warm water.

I then blasted my screen standing roughly a metre away from it. I used a high pressure jet wash. I was careful to not keep the jet on the same place for too long as it can distort the stencil.


You may be able to see a previous design underlying your stencil but this shouldn't affect your stencil. Once I had completely revealed my design (which can be checked by holding it up to the light) it was put in a drying rack until totally dry. At this stage I was ready to print!! 

Producing a Kodatrace

For the last few weeks Iv'e had print workshops leading toward a final cushion design for a Printed Surfaces brief. I learned how to use Devore, Pigments, Discharge, Illuminating Discharge, Flocking, Steaming, Fixing&Finishing.

Firstly Im going to tell you how I produced a silk screen to print with. You will need to produce a KODATRACE which is a a copy of your drawings/images that you want to use for printing with.

 I drew my designs onto Kodatrace. This paper is similar to tracing paper with a thicker texture. You can draw on kodatrace using a light light fast pen and a black chinagraph pencil.
Pilot lightfast pen (Above)
Sharpie Chinagraph pencil (Below)


I used the PILOT Perma Ball lightfast pen and a SHARPIE peel off China graph Marker. The pen has a gel pen quality and the "marker" is more like a waxy pencil. When producing your Kodatrace, you must ensure that all the lines DO NOT allow any light through at all. The pen produces a thick line and the pencil is able to achieve a thiner liner and other textures which the pen cannot. You can also use a good quality indian ink. Make sure that the ink is opaque and no light can get through. You may need a few coats.


Kodatrace pen & chinagraph pencil.


Indian ink.


Add caption
This is my Kodatrace. I then added some shading to the feathers using black indian ink. I painted it with a few layers to make sure it was opaque.
Kodatrace with indian ink added to the feather designs.

Wednesday, 2 November 2011

Edible Fashion

Hey everyone,

Just a quick update since I'm crazy busy screen printing all week in preperation to make my cushion. Printing, printing, printing. Anyway... On my way to uni most mornings I grab a free Metro newspaper and read it on the train. I found this tiny article eye catching and intriguing.

This dress was designed by Australian fashion designer and chef Roland Trettl. It is made out of seaweed and octopus. I think tge octopus looks amazing round the neckline but isn't very appropriate for day to day wear for obvious reasons.

The dress was designed for a collection of (Apx 50) photographs to be shown at The Communications Museum in berlin. The exhibtion started on October 29th 2011 and will end on January 29th 2012. The photographs were created by Trettl and photographer, Helge Kirchberger.

This concept truly takes "edible art" to new lengths! Other photographs shown edible fashion depicting vegetabless, fish skin and other food.

Trettl works at Ikarus Resturaunt. Check out the web page to see which guest chef's are working there this month!

Hope you like it! Leave comments... If you hate it or love it...?
Visit Metro online for more information on Style, Sport, News, Showbiz, Tv, Music, Film and lots more!